Crayon Cake

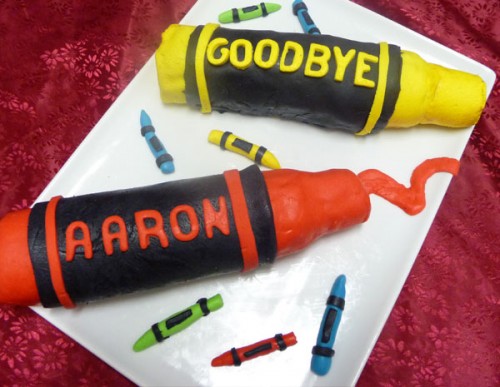
Today was the last day of our senior designer. While sad, we wish him the best wishes for his new opportunities. The common office joke is to tell the designers to go play with their crayons… so what better parting gift than a crayon cake.

crayons

Due to band commitments, I made the fondant on wednesday night and then starting at 10:30pm on Thursday baked, iced and assembled the cakes. I finished at 1:00pm! While I hate feeling rushed, I’m still happy with the final result and even better Aaron and the rest of the office loved it too.

Warning: There is absolutely nothing healthy and heaps and heaps of nasty stuff in this cake. If you are interested read on :)

The base cake is the sponge cake from the dorbos torta recipe. I’m proud to report that I got it perfect this time!
I then rolled it with the chocolate buttercream from the same recipe (again perfect). The tips are icecream cones filled with the remaining sponge and attached with toothpicks. Long wooden skewers or paddle pop stick would be better, but I couldn’t find any. The construction idea is from the wilton website.

I’m not a big fan of fondant (especially the premade stuff), however it was needed for this project so I thought I would try marshmellow fondant. Unfortunately I couldn’t find any butter essence/extract which I think would help smooth out the overwhelming sugar taste.  I shrunk the recipe into more manageable and easy to colour segments. The following makes about 370g of fondant.

  • 125g marshmellows
  • 1/2 tbs water
  • 1/4 tbsp glycerine (not 100% necessary)
  • 1/2 tsp vanilla
  • 250g of icing sugar plus some spare.
  • Copha
  1. Sift the icing sugar into a large bowl
  2. In a microwave safe container (I used a blue large tupperware one) add the marshmellows, water, glycerine and vanilla. THIS IS A LOT OF FUN!
  3. Mix gently
  4. Microwave 1 min – watch the marshmellows – they expand! Also be careful
  5. Add food colouring and mix through
  6. Add the marshmellow mix to the icing sugar and mix with a wooden spoon
  7. Coat your hands and a surface (that won’t stain) with copha
  8. Kneed the marshmellow mix into a playdough consistency
  9. Coat the mashmellow thinly in copha and wrap in cling wrap.

When you are ready to use, microwave for 15seconds. Coat your working surface in copha and roll and manipulate as needed

If I was to do it again, I would probably go for a chocolate sponge and a cream filling to try to counter the sugar taste of the fondant.
photos from riverfire

Last night was riverfire, a celebration of our Brisbane river every year letting off 30min of fireworks. My band is very lucky as we have a few members that are part of the maritime museum. So we give a concert and then get the lovely privilege to stay for the fireworks without needing to squish into southbank.

fireworks from the goodwill bridge
Click the pic to see the flickr slideshow

My camera is a panasonic lumix tz15 (a nice point and shoot). Andrew got it for me (after I did the research) last year just before riverfire as my old canon ixus 430 had decided that it wanted to die (after 6 years of heavy use). This year I had the chance to read the manual a little more and find features to control the more manual settings (though the automatic fireworks setting does an amazing job too). I ditched the tripod this year and still about 90% of the photos turned out nice and clear so I got to choose the ones that I thought were interesting. I probably should go back through all and find ones I can reframe and make a little more interesting.

Fireworks cupcakes

Made to take to riverfire. They were a bit rushed as we weren’t sure how long it would take us to get there with the trains

cupcakes

They are just the simple hersheys chocolate cake recipe, however I love it as it is one of those yummy hassle free recipes. The icing is a chocolate fudge icing recipe – perfect addition to the lovely moist fudgy cake!

Breaking things

Don’t Panic!

I’ve finally decided to upgrade the site to 1024*768 to give me more content room. In the really stupid and lazy way to do things, I’m testing the files live so if you see anything go crazy, come back in a little while :)

First attempt at Dobos Torta

Today I realised that this baking ban isn’t going to happen, the addiction to baking something every weekend is too strong. So I decided to embrace it and actually plan and learn to bake some interesting things. I applied to join daring bakers, but unfortunately missed the cutoff day and will have to wait till Oct to start on the challenges. Their August challenge was Dobos Torta. The concept seemed simple enough, but I’m not happy with my execution. It could have to do with the fact that I started at 9pm, I need a bigger fridge or a cooler kitchen, but I think this time it was my lack of experience and the rush to get it finished.

My final torta…
torta

torta2

I’m sitting here at 1:34am having a small slice. The texture isn’t perfect but the taste is delicious!

[added the morning after]
Things I learnt:
1. Starting cleaning the kitchen at 9pm is not a good start to baking. I had been planning to make this mid morning, but once the house duties, shopping, dinner etc had been done, it was suddenly 9pm.

2. 200 deg C is too hot on my oven for this cake. The edges of my sponges we browning and burning before the inner part was cooked. This also could have been because I was using a baking tray not baking sheets.

3. Make sure you are really even with your sponge and that it cooks nice and evenly. Spots where the sponge is too thin or not cooked properly will be prone to ripping when pulling back the paper. This is really hard in my oven as the back of my oven is hotter than the front and it is small so the tray can’t be rotated easily. I’m thinking that I might have more luck making a mini version of the cake on a smaller tray.

4. Room temperature is a lot hotter than normal when the oven has been on and the stove. I did let my buttercream cool to room temp before adding the butter but I think this was still too warm. Next time I will chill it in the fridge. Also note to self, make sure there is room in the fridge, which is very hard after just doing the food shopping for the week. My butter was probably a little too soft due to the warmness of the room too. I’ll just have to note to leave it in another place of the house till ready. This made kind of more of a ganache than a buttercream.

5. Leave the caramel longer. I’ve made caramel toffee successfully before, but I was scared of over doing it last night as the recipe said amber. It looked amber in the pot but was not ready and far too runny.

I understand the concepts and errors a little more now and will have to try again once I find some people to consume this one.